
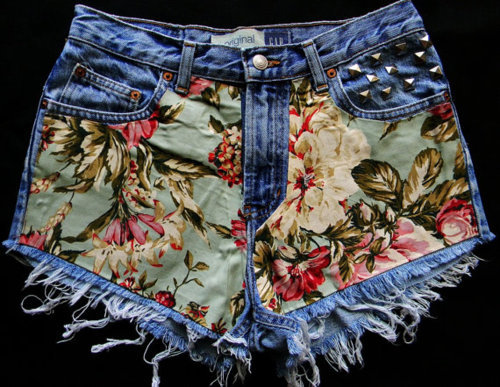
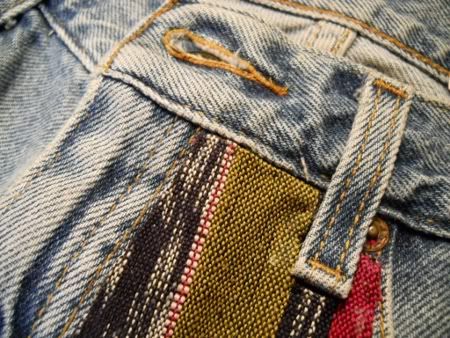
(clicks through to my fashion Tumblr. I regret that I don't know the source of this photo. VERY SORRY; CONTACT ME IF THIS IS YOURS.)
I happened to have some cool fabric saved in my remnants suitable for the job. And some Levi's cutoffs from the Salvation Army.
As you can see in the picture, the fabric appears to be adhered to the denim without stitches; it looks like it's glued on. So I armed myself with some fabric glue, which I've never used before, so this was kind of experimental, and set to work.
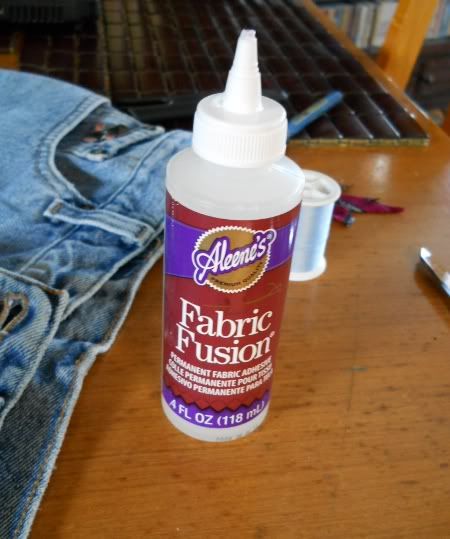
You have to cut the tip off of it to start using it. I joked that it's Jewish glue. Mom didn't laugh as much as I'd hoped.
I started with what looked to be the hardest part, because that's the kind of gyal I am: the belt loop.
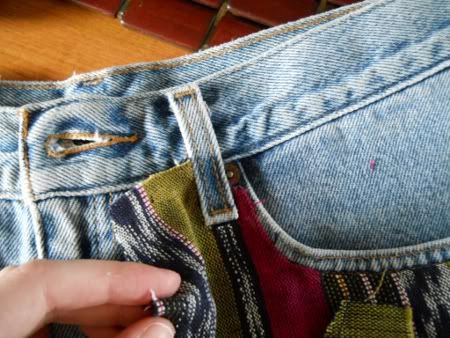
I cut one incision not quite the length of the belt loop, and two more diagonally to the corners, then folded under; that's how it sits flush with the loop. (In my opinion I did this much more neatly than whoever made the inspiration shorts ... )
First I tried just using the glue, but the shit totally doesn't stick right away and I don't know how long you have to hold it for it to bond. I don't have that kind of patience. So what I did was put glue down, press the fabric into place, and tack a small stitch into it through the glue, on each corner.
Then I went for the pocket. This was kind of tricky because it's curved. This would have been much harder with the cotton used on the inspo pair, but my fabric has a bit of leeway, so it curved nicely. I continued my glue/press/stitch method.
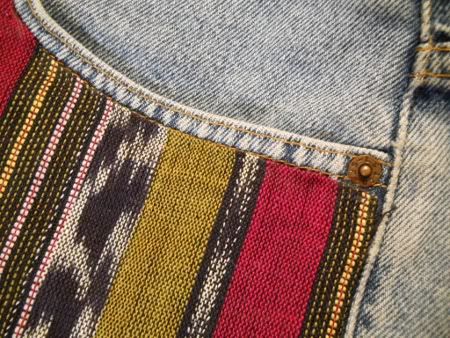
artfully dodged that rivet
Then I tackled the crotch area.
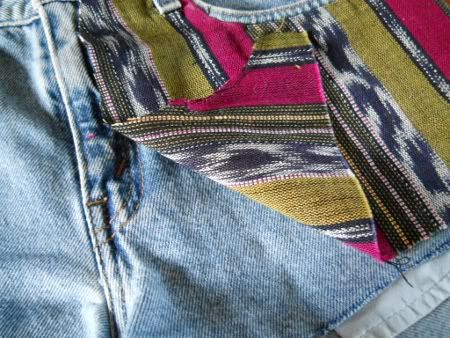
This proved the most difficult because I didn't cut it very smartly. Oh well.
And here's the final product!
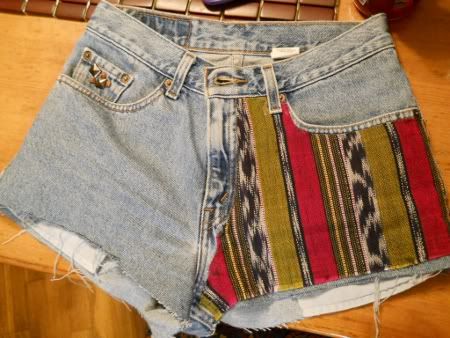
Now I know why the original DIY'ers opted for the angular cuts around the zipper. That crotch part was unnecessarily challenging. Luckily the un-straight line doesn't show when I put the shorts on.
I opted for just one side for now, because I'm a little wary of this look ...

Also I didn't want it to be like the "skort" effect, where you think it's one thing in the front and then you find out you've been horribly deceived, by the back. I guess you could call it the "mullet" effect, too. Well anyway, there's still more fabric, if I change my mind.
They turned out great! I like your fabric better than the "inspiration" fabric, too.
ReplyDeletelove what you did with the shorts:)
ReplyDeletehttp://futurereflections-yerina.blogspot.com/
woww.. you made this shorts like this??
ReplyDeleteawesome !!! cool =D
i want you do it to my shorts too..
very interesting blog, dear .. =)
hope we can be friend in here & chictopia..
visit & follow me in blog and chictopia if you like mine !!
xoxo
www.melodyofmywords.blogspot.com
WOW. What a great idea girl!!
ReplyDeleteBe sure to check out our blog too over at www.shervinsworld.com
i love these!
ReplyDeletedoes the fabric stay put when you wash them?
It does, because it's stitched down on three sides :)
DeleteDo the other side and Frey the bottom maybe get a grater (cheese) or similar to rough it up a bit xxx looks good though
ReplyDeleteThey frayed on their own, because I didn't hem them. I'm not personally a fan of denim that's been totally hacked up.
Deletedoes it matter what kind of fabric you use?
ReplyDelete